
The shortest path: ask a focused question in Chat, move a clear brief into the Builder, inspect the preview, and publish only the version you reviewed.
When an action is still processing or its response is uncertain, use its saved status and the recovery guidance below before submitting it again.
Start here
AvailableA first useful session, in one sitting
Joisk is easiest to learn by making one small thing. The workspace, Builder, and Studios share an account context, while the visible controls tell you which actions your current rollout supports.
Before you start
A browser and a Joisk account. Sign in at Sign in when the workspace asks you to save or create.
How to do it
Start here
AvailableStart with a conversation
Chat is the broadest entry point: ask, explore, attach context where the UI allows it, and decide whether the next step is an answer, a project, or a creative output.
Before you start
Know what you want to understand or make. A short goal, audience, and desired format are enough; add a reference file only when it helps.
How to do it
- 1Open Chat and write the outcome you want, not only the feature name.
- 2Include constraints such as audience, tone, device, or a reference format.
- 3Read the response, then ask for the next smallest change instead of restarting the whole request.
- 4When Joisk offers a Builder or Studio path, follow that visible handoff so the project context stays attached.
Create a simple one-page event site for a neighborhood film night. Audience: families and local volunteers. Include: schedule, venue, accessibility note, and a clear RSVP action. Keep the first version calm, readable, and easy to edit.Start here
AvailableTurn a brief into your first website
The Builder creates a project from a plain-language brief. Start small, make the first version visible, and use the conversation to refine it rather than trying to specify every detail up front.
Before you start
A signed-in account and a brief that names the project's purpose. You can also start from a template in Discover when one fits.
How to do it
- 1Open Builder and type what the project should help someone do.
- 2Choose a project direction when the start screen offers one, or let the brief define it.
- 3Press Start building. If sign-in appears, complete it in the inline prompt so the brief can continue.
- 4Open the project workspace, inspect the preview, and ask for one targeted change.
.png, .jpg, .webp, .gif, .txt, .md, .csv, .json, .html, .css, and .js through its visible file control.Start here
AvailableMake one creative asset
Use a focused Studio request, then treat the saved result as the source of truth. The Studio history and owner library are more reliable than a browser tab that happened to stay open.
Before you start
A signed-in project context when the Studio asks for one, plus a clear prompt. Decide whether you need an image, video, audio, or 3D result before choosing the tool.
How to do it
- 1Open Tools and choose the matching Studio.
- 2Describe the subject, intended use, and any reference or duration the control requests.
- 3Review the tier, format, and visible estimate before starting a generated action.
- 4Wait for the result to appear in the Studio history, then preview or download it from there.
Build
AvailableWrite a brief Joisk can act on
A good brief gives Joisk a job, a person, and a boundary. You can refine visual taste later; the first pass should make the intended behavior inspectable.
Before you start
Name the audience, the primary action, and the smallest version that would be useful. Keep private credentials and real personal data out of the brief.
How to do it
- 1Start with the outcome: “Help a visitor book a time,” “Help a team track requests,” or “Help a player reach a goal.”
- 2Add the key screens or states, the tone, and any references Joisk should follow.
- 3Submit the build and watch the visible activity/status surface instead of assuming a request finished.
- 4When the first version is ready, use the preview and ask for a focused edit.
Build a small internal request tracker. People can create a request, assign an owner, set a status, and filter by open or done. Use a quiet navy interface with a clear empty state and keyboard-friendly controls.Build
AvailablePreview, target, and refine
The preview is where you verify the visible result. Use a targeted instruction when one component is wrong, and inspect the proposed change before applying it.
Before you start
A project with a previewable version. If you know the exact element, use the preview selection control; otherwise describe its label and location in Chat.
How to do it
- 1Open Preview in the project workspace and check the primary path at the viewport you care about.
- 2Click the relevant element when the preview offers click-to-edit, or describe its label and location in Chat.
- 3Read the proposed diff or review state before applying the change.
- 4Reopen Preview after the edit and check both the changed path and the nearest unaffected path.
Build
AvailableUse versions as a safety net
Versions separate experimentation from the last reviewed state. Restore an earlier version when a change moves the project in the wrong direction, then inspect before publishing again.
Before you start
A project with at least one saved build. Keep the version that is currently public in mind; private edits do not become public until you publish them.
How to do it
- 1Open the project's History or Versions surface.
- 2Compare the candidate with the version you last trusted.
- 3Restore the earlier version when needed, then reopen its preview.
- 4Make the next edit from the restored version and publish only after review.
Build
AvailableKeep assets reusable and owner-scoped
Uploads and generated results live in an account-aware asset library. A project link tells you where an asset is used; an owner-library result can be reused where the target Studio supports it.
Before you start
A signed-in account and, for project-linked assets, the project you want to work in. Use invented or approved fixtures for disposable tests.
How to do it
- 1Open the project's Assets panel or the account Assets view.
- 2Upload a supported file or create a result in a Studio.
- 3Check the asset label and project association before reusing it.
- 4Download or place the asset through the visible control; keep the original when an edit is non-destructive.
Create
AvailableChoose the Studio by output
Joisk has separate creative surfaces so each result can show the right inputs, job status, preview, and saved-output behavior. Start from the output you need, not from a model name.
Create
AvailableGenerate and reuse an image
Image Studio lets you make a result, compare it with another option, download it, and carry it into compatible project contexts.
Before you start
A signed-in project context and a prompt. Use a reference asset only when you have permission to use it.
How to do it
- 1Open Joisk Image and describe the subject, composition, and intended use.
- 2Choose the visible quality tier and review the estimate before generating.
- 3Compare saved results, select the one you want, and use its preview or download action.
- 4Reuse it from the project or account asset library when the destination supports that type.
Create
AvailableFollow a video render from queued to ready
Video generation is asynchronous. The important path is submit → status → saved result, not a browser tab that appears to wait forever.
Before you start
A signed-in project, a prompt or supported reference input, and the duration, resolution, and aspect choices the Studio exposes.
How to do it
- 1Open Joisk Video and choose text, image, or reference mode.
- 2Set the duration, resolution, aspect, and optional camera treatment.
- 3Review the estimate and submit once. Watch for Queued, Rendering, Finalizing, and Ready.
- 4When the job is Ready, preview or download the saved video from the render history.
Create
BetaEdit local media in Video Editor
Video Editor is a local-first beta surface for assembling media on a multi-track timeline. Keep the source files you import; the editor is not a replacement for your originals.
Before you start
Local source media you are allowed to edit. The editor can use local videos, images, audio, and project context; cloud generation is a separate action.
How to do it
- 1Open Video Editor and import the local source files you need.
- 2Place clips on tracks, trim the in/out points, and adjust the visible audio controls.
- 3Play the sequence through the important transition and check captions or text overlays.
- 4Save the edit or export through the control the beta surface makes available.
Create
AvailableMake music or voiceover
Audio Studio separates music and voice modes so the prompt, duration, and playback controls match the output you want.
Before you start
A signed-in project, a short description of the sound, and a duration when the selected mode asks for one. Use a voice or likeness only with the required consent.
How to do it
- 1Open Joisk Audio and choose Music or Voice.
- 2Describe the sound and set the duration or voice controls the mode provides.
- 3Review the tier and estimate, then generate once.
- 4Play the saved result, select it for reuse, or download it from the Studio history.
Create
PartialCreate a supported 3D asset
3D asset generation and inspection are available in the 3D surface. The separate Engine 2 scene editor is not described here as a generally available workflow.
Before you start
A signed-in project and a clear description of the object or asset. Check the output type shown by the current Studio before planning a scene around it.
How to do it
- 1Open Joisk 3D and describe the model or asset you need.
- 2Review the visible quality tier and any input requirements before starting.
- 3Inspect the saved model result and confirm its asset type before reusing it.
- 4Attach it only through a compatible project or Studio control.
Create
PartialGames are still in development
Joisk has game routes and an evolving game-building surface, but the complete game workflow is not represented as generally available in this documentation.
- Safe to say: game projects and a browser game surface exist in the product, and the Builder can offer game starting points.
- Check first: the current account's Builder or Game Studio controls, the visible save/play path, and the release owner's readiness for any specialist feature.
- Not promised here: a finished multiplayer backend, game marketplace, or native store package.
Publish
AvailableReview before you publish
Publishing makes a chosen project version public. Treat review as a boundary: a private edit should stay private until you deliberately publish it.
Before you start
A previewable project version, an intentional public audience, and a check that you are not including secrets, personal data, or unapproved media.
How to do it
- 1Open Review or the publish control in the project workspace.
- 2Check the main path, empty states, links, forms, mobile layout, and visible content.
- 3Resolve any security, content, or readiness warning the review surface shows.
- 4Publish the reviewed version and copy the resulting public link only after it is visible.
Publish
PartialConnect a domain only when the account offers it
Custom domain connection can be plan- and rollout-gated. The Account → Domains panel is the source of truth for the DNS target, verification state, and supported actions.
Before you start
A published site and an eligible account. Do not change DNS until Joisk shows the exact records for your domain.
How to do it
- 1Open Account → Domains.
- 2Add the domain and select the published site the panel offers.
- 3Copy the shown CNAME or verification TXT records to your registrar.
- 4Return to Joisk and choose Verify; wait for the certificate/status result before switching traffic.
Publish
PartialUse a payment account you control
A project can use your own payment account through a project-scoped Stripe connection when that option is enabled, or through a provider-hosted checkout link. Neither path is the Joisk marketplace.
Before you start
Your own payment-provider account. Confirm its merchant, processing, tax, refund, marketplace, and payout terms before publishing a Buy action.
How to do it
- 1In the Builder, ask JoiskBot to “set up payments” or open Add-ons → Payments.
- 2If Connect Stripe is available, choose this project's test or live environment and finish Stripe's connection page. Otherwise paste an https checkout link from your provider.
- 3Review the button label, price copy, destination URL, and what the buyer receives.
- 4Publish only after a safe test confirms checkout and, for a Stripe connection, the expected webhook fulfillment. A connected status by itself is not proof of fulfillment.
Publish
PartialExport source and understand installability
Joisk-hosted publishing and source export are separate choices. A public web link or installable web app is not the same thing as a store-approved native application.
Before you start
A project with a saved version. If you are exporting for another host, verify any runtime, asset, and environment requirements before leaving Joisk.
How to do it
- 1Open the project settings or export control.
- 2Choose Export and download the source package when the action is available.
- 3Keep the downloaded source and its version information together.
- 4For phone access, share the published web link or use the browser's Add to Home Screen / Install action where supported.
Across devices
AvailableUse the browser workspace as the default
The browser is the primary public surface for Chat, Builder, creative Studios, account controls, and published links. Responsive layouts can change which panels are visible.
- Chat: use /chat for conversations and context handoffs.
- Build: use /builder for a new project and /builder/projects for the project list.
- Studios: use /tools to choose image, video, audio, or 3D.
- Account: use /account for projects, assets, usage, billing, domains, and settings.
Across devices
BetaWindows Desktop is a beta surface
Joisk Desktop lets you choose a local project folder and review actions that affect it. It is a separate client: its controls and release state can differ from the browser workspace.
Before you start
A supported Windows beta package from the official Download page, a folder you choose, and a signed-in Joisk account.
How to do it
- 1Install the current Windows package from Download; check the version shown there.
- 2Open or start a conversation, then choose the project folder when the app asks.
- 3Read each proposed local action. Commands such as dependency installation, tests, or builds require the app's approval control.
- 4Open the preview when it appears and return to the conversation for the next change.
Inside the Windows beta
Your first steps in Joisk Desktop
An annotated view of the desktop app. Choose a step to find the control.
Watch the 25-second tour
Silent, captioned screenshot tour of the Windows beta.
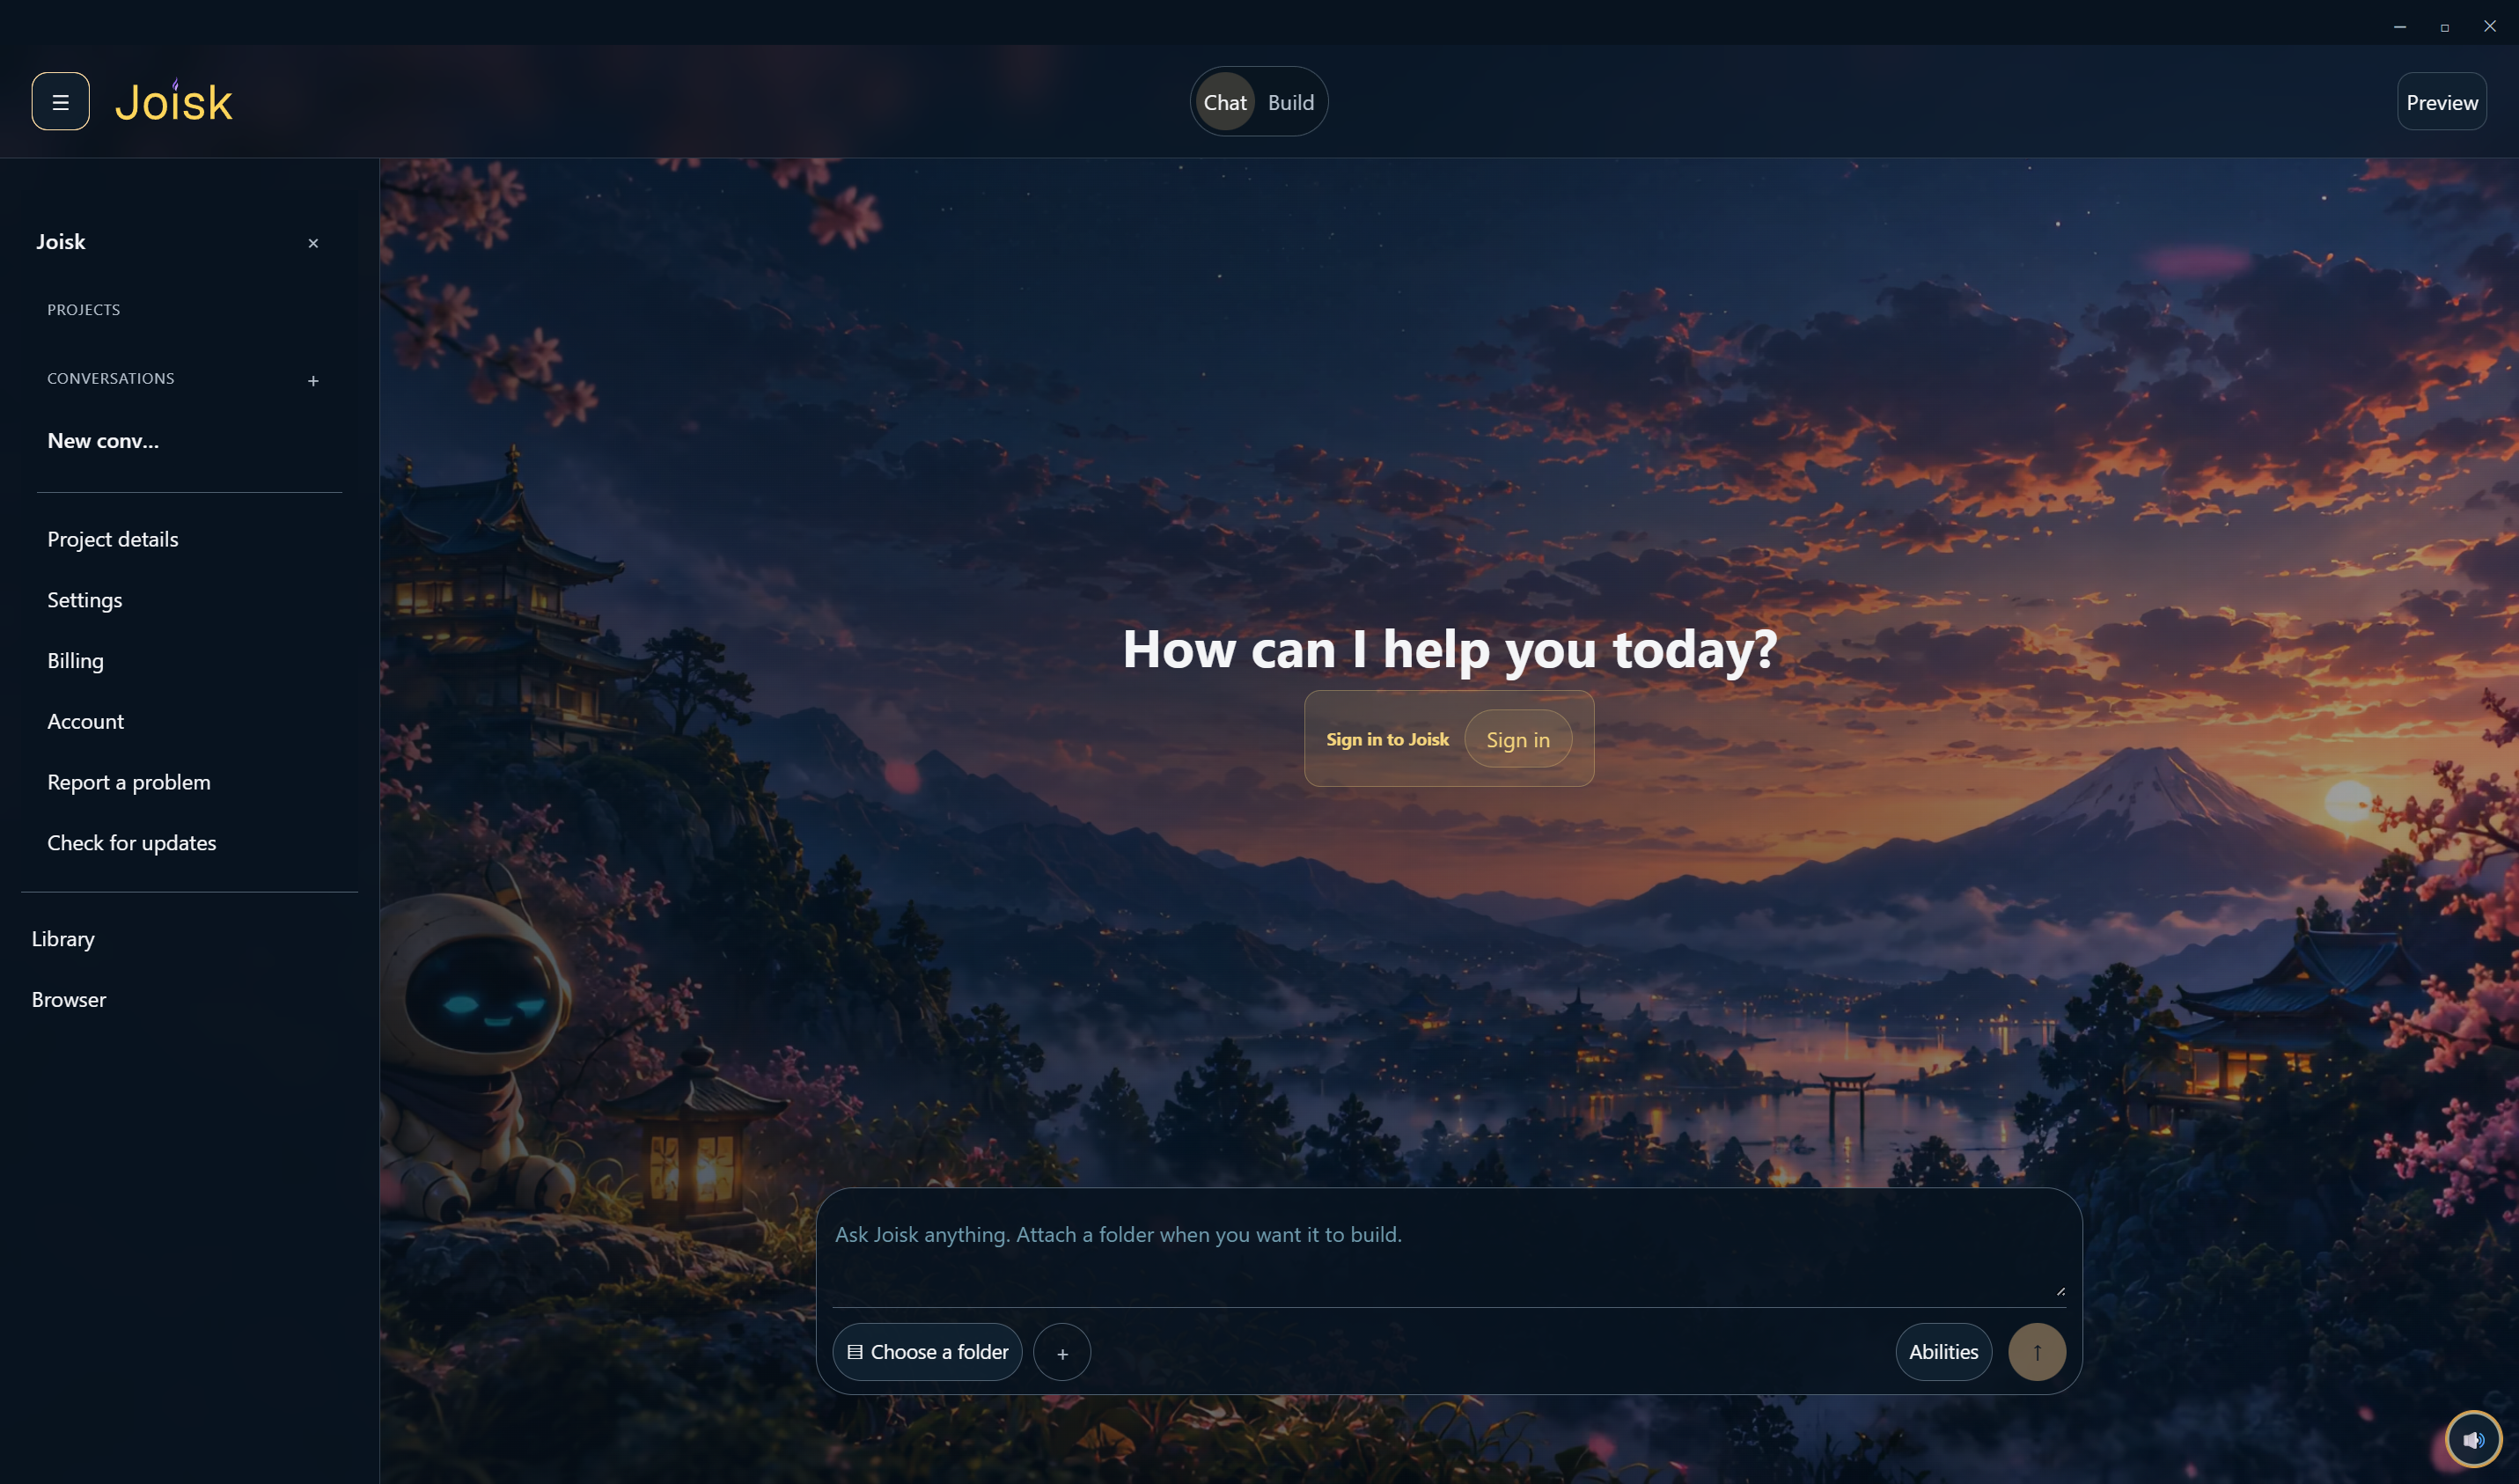
Windows beta screenshot. The web workspace and upcoming mobile apps may look different.
Across devices
UpcomingNative mobile clients are not general availability
Published Joisk web projects can be opened on phones and may be installable as web apps. Separate Android and iOS clients, store submissions, and their feature parity have their own release gates.
- Today: share a published web URL and use the phone browser's install/Add to Home Screen action when the browser offers it.
- Coming separately: native Android and iOS packages, store availability, and platform-specific feature acceptance.
- Do not assume parity: a feature working in browser or Windows Desktop is not evidence that the mobile package supports it.
Account & usage
AvailableSign in, recover, and find your work
Your account is the home base for private projects, assets, publishing, usage, billing, and settings. Account data is owner-scoped; a signed-out visitor should not see another creator's work.
Before you start
The email or Google sign-in method you used for the account. Never send a password, reset link, token, or private key to support.
How to do it
- 1Open Sign in and use the account method you recognize.
- 2If you need a password reset, use the visible reset path and return through the normal sign-in page.
- 3Open Account and choose Projects, Assets, Published, Plans & usage, Billing, Domains, or Settings.
- 4Sign out before handing the browser or a shared test device to someone else.
Account & usage
AvailableRead Usage for your weekly allowance
The account Usage view is the authoritative reading for your weekly, cost-backed AI allowance, consumption, reservations, reset state, and infrastructure. The old Credits URL remains a compatibility explanation for historical records.
Before you start
A signed-in account and a connection to the Joisk server. If the server cannot return a current snapshot, treat the state as unavailable rather than zero.
How to do it
- 1Open Account → Plans & usage.
- 2Check the current plan, weekly window, category quantities, active operations, and the server-confirmed reset time.
- 3Read infrastructure separately from AI usage; storage, bandwidth, email, database, compute, and build measurements are not interchangeable.
- 4Use the visible refresh or reconciliation action when the panel says a result is pending.
Account & usage
PartialPlans and billing
The launch lineup is monthly USD pricing, while checkout and entitlements remain gated until the full billing path is verified. Existing subscribers keep their current terms until a separately verified migration.
Before you start
Know whether you are a new account or an existing subscriber. Use the signed-in Billing panel for current subscription status, period end, and payment-method actions.
How to do it
- 1Read Plans & pricing for the Starter $9, Plus $27, Pro $97, and Studio $197 monthly lineup and its current checkout status.
- 2For an active subscription, open Account → Billing and choose the visible management action.
- 3Confirm the price, currency, interval, renewal, and failure state in the account or provider portal before changing anything.
- 4Keep included weekly AI allowance, one-time AI resets, and infrastructure resources separate. Infrastructure overages require explicit opt-in, a saved payment method, and a spending limit; AI never bills automatically.
Account & usage
PartialWatch storage and hosting separately
Asset storage and published-site delivery are different meters. Storage can be a hard cap; infrastructure overages are separate and require explicit opt-in when your account supports them.
- Storage: open the account Billing/usage surfaces and read the used-versus-included meter before uploading more.
- Hosting delivery: read bandwidth used, included, forecast, and overage state as a separate resource.
- Infrastructure extras: enable them only after reviewing the displayed rate, saving a payment method, and choosing a spending limit.
- When full: keep a local copy, remove only recognized assets, or use the plan action the account provides.
Connect
PartialConnect only what the account exposes
Optional connectors have their own scopes, secrets, and rollout gates. The supported public guidance here is intentionally narrow: GitHub sync and bring-your-own provider keys.
Before you start
An account you own and the minimum token or key scope shown by the connection UI. A provider subscription is not the same thing as an API key.
How to do it
- 1Open the account Settings/connection panel and read the purpose and scope before connecting.
- 2Use a fine-grained token or key created for this integration; never paste a production secret into a prompt or support message.
- 3Confirm the connected status, then perform only the Push/Pull/Test action you intended.
- 4Disconnect from the same panel when you no longer need the integration; revoke the token at its provider too.
Connect
UpcomingThe API and MCP surface is a preview
The developer route is useful for exploring programmatic workflows, but internal API paths and preview tools are not a stable public contract.
- Use the preview: read Developer / MCP when it is available in your rollout.
- Do not depend on internals: routes under
/apican be account-gated, rollout-gated, or changed without a public API guarantee. - Keep writes explicit: an automated client must preserve the same authorization, readiness, usage, and recovery boundaries as the browser.
Reference
AvailableFormats the current UI commonly shows
These are the common extensions exposed by current controls. The picker or upload control on the surface you are using remains authoritative for size, duration, and exact support.
| Surface | Common formats | What to check |
|---|---|---|
| First Builder attachment | .png, .jpg, .jpeg, .webp, .gif, text/code files | Use the visible file picker; keep private data out. |
| Video assets | .mp4, .webm, .mov | Check mode, duration, resolution, and reference limits. |
| Audio assets | .mp3, .wav, .ogg, .m4a, .flac | Check the selected Music or Voice mode. |
| 3D assets | Use the supported 3D picker and inspector. | Do not assume every model extension or scene editor is available. |
Reference
AvailableShortcuts that keep you moving
Keyboard paths are intentionally small and predictable. Controls can vary between browser Chat, Builder, Studios, and Windows Desktop.
| Shortcut | Where | Action |
|---|---|---|
| Enter | Builder prompt | Start the build when the prompt has content. |
| Shift + Enter | Builder prompt | Add a newline without submitting. |
| Ctrl/⌘ + K | This documentation | Focus the docs search. |
| Escape | Windows Desktop beta | Stop or cancel a supported in-progress action when the app shows that behavior. |
Reference
AvailableWords Joisk uses
A shared vocabulary makes status and recovery easier to read.
| Term | Meaning |
|---|---|
| Project | The account-scoped workspace that holds a brief, versions, preview, and compatible assets. |
| Version | A saved project state. Publishing pins a chosen version until you publish another. |
| Asset | An uploaded or generated file with an owner-scoped saved reference. |
| Job | A work request such as a video render that can move through queued, processing, ready, or failed states. |
| Reservation | Usage held for work in progress. It is not the same as completed consumption. |
| Reconciliation | Checking the durable outcome after a response or provider result was uncertain; it is not an automatic replay. |
| Infrastructure | Resources such as storage, bandwidth, email, database, compute, or build delivery measured separately from AI usage. |
Troubleshooting
AvailableWhen a result is slow, missing, or uncertain
The safest recovery path is symptom → status → one bounded action → escalation. A lost browser response is not proof that the server did nothing.
Before you start
The project or Studio surface that started the action. Keep any visible request, job, operation, or receipt identifier.
How to do it
- 1Read the current status in the original conversation, project, render history, or account Usage panel.
- 2Refresh the status or saved history once if the connection has recovered.
- 3If the status is ready, use the saved output. If it is failed, read the reason. If it is uncertain, stop and reconcile.
- 4Escalate with the visible timestamp and identifier when the bounded recovery does not resolve the state.
Troubleshooting
AvailableHelp and escalation
Support is most useful when it can reproduce the symptom without receiving your secrets or private content.
Before you start
The route or Studio name, what you expected, what you saw, and the approximate time. Use a marked fixture or disposable account for reproduction where possible.
How to do it
- 1Check the relevant guide and retry only the safe, bounded recovery it describes.
- 2Open Help for guided topics or Contact for a person.
- 3Include the visible error, request/job/operation ID, browser or app version, and whether the result was ready, failed, or uncertain.
- 4Leave out passwords, reset links, tokens, private keys, payment numbers, personal documents, and unredacted private conversations.
Missing a guide or found a mismatch? Tell the Joisk team.